Creating a members-only blog in WordPress is one of the most practical ways to build a more engaged audience while keeping control over how your content is accessed. Instead of making every post completely public, you can allow visitors to read part of the page and then restrict the rest so that only logged-in users can continue.
This gives you a much stronger balance between visibility and control. Search engines and new visitors can still see enough of your content to understand its value, while deeper access is reserved for people who have taken the step of registering or logging in.
For creators, publishers, educators, and niche content sites, that can be a far better approach than trying to force everything behind a heavy membership system from the beginning. You are building a user base gradually, using the content itself as the reason to join.
When handled well, a members-only blog does not feel restrictive in a negative way. It feels structured. The page still flows naturally, the value is still visible, and the point of access change becomes part of the experience rather than a disruption.
That is why login-based content gating is such a strong fit for modern WordPress sites. It allows you to restrict content in WordPress easily while keeping everything inside the block editor and inside the page itself.
What a Members-Only Blog Actually Means in WordPress
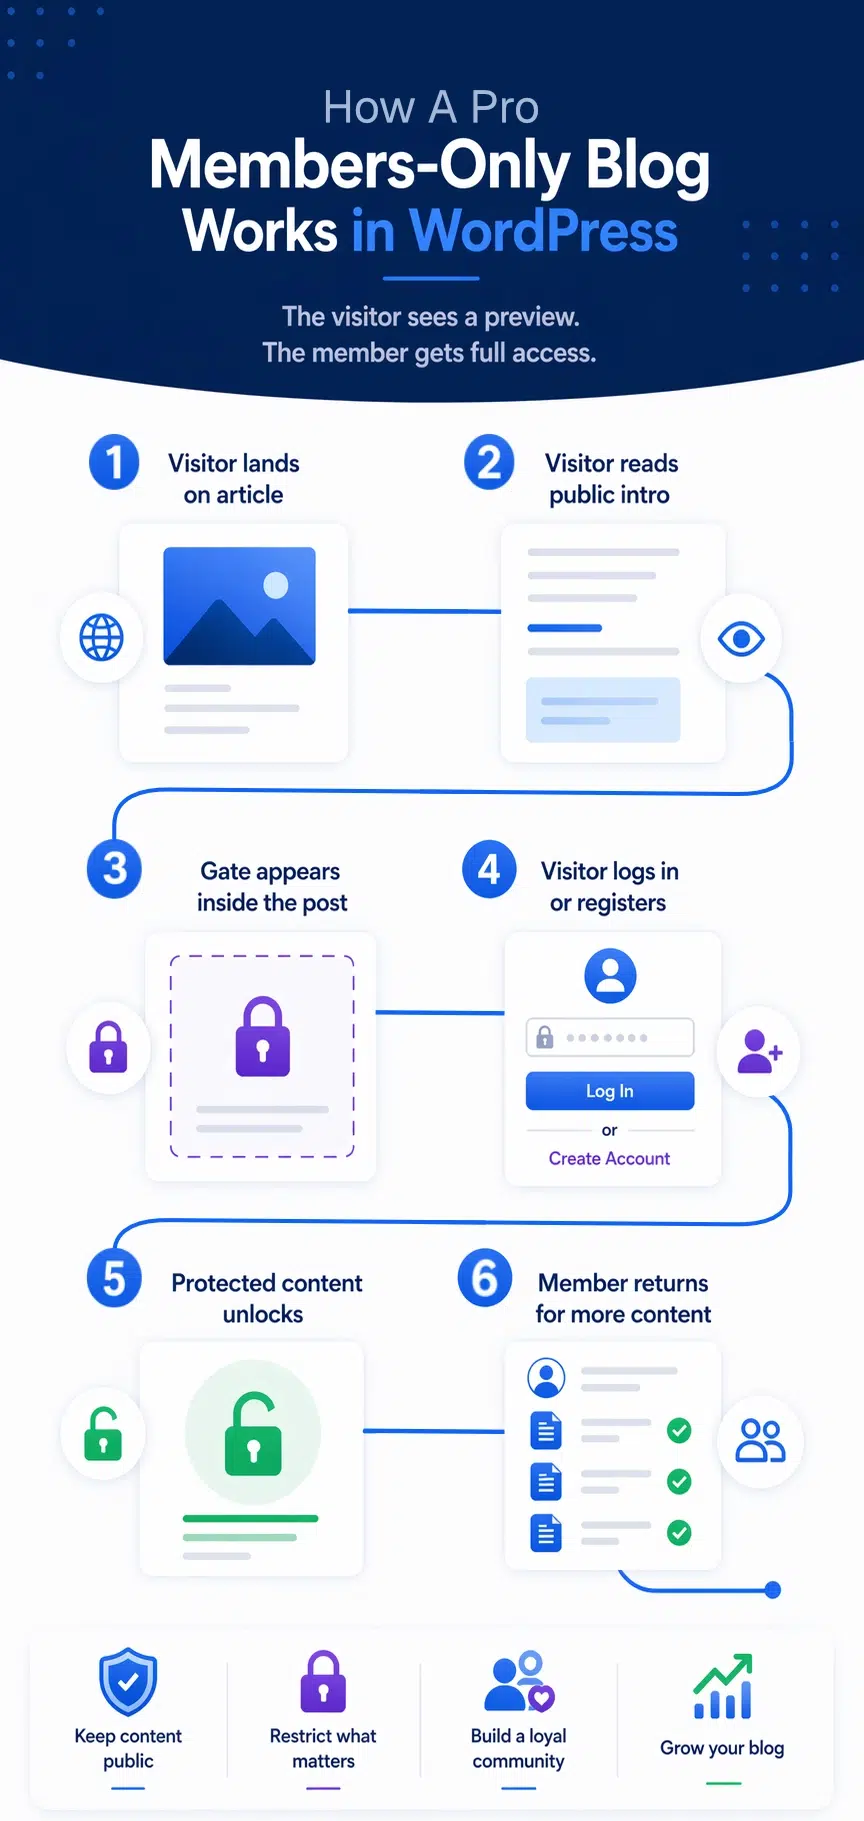
A members-only blog is a site where some or all of the content is restricted based on whether the visitor is authenticated. In the simplest version, a user can view the beginning of a post but must log in to continue reading the rest.
This is different from a full paywall or a traditional closed membership site. The goal is not necessarily to hide everything or force payment immediately. The goal is to create a meaningful reason for users to register, sign in, and become part of your site’s ongoing audience.
That makes this model especially useful for blogs, learning content, private communities, resource hubs, and specialist publishers who want to build long-term engagement rather than relying only on one-time traffic.
Once users have an account, your site gains more than just a login state. It gains continuity. Readers can return, access protected content again, and gradually become more invested in what your site offers.
Why Restricting Content After Login Works So Well
Restricting content after login works because it asks the user for a relatively low-friction action at the moment their interest is already established. Instead of interrupting them immediately, you let them experience some of the content first, then present login as the next step to continue.
This is much more effective than gating content too early. If users have already seen enough to understand the quality and relevance of what you offer, logging in feels justified. It becomes part of the flow rather than an obstacle.
It also preserves important SEO advantages. Because the visible portion of the article remains public, search engines still have content to crawl and users arriving from search results can still evaluate the page before deciding to register.
In other words, login-based restriction allows you to protect deeper value without sacrificing discovery. That is a strong position for a content-driven WordPress site to be in.
It Helps Build a Registered Audience
Every gated article becomes a chance to convert a casual reader into a registered user. Over time, that creates a growing audience that is easier to retain, easier to serve with future content, and easier to guide toward premium offers later if you decide to monetise more aggressively.
It Encourages Repeat Visits
Once readers have an account, returning to your content becomes easier. They no longer need to decide whether your site is worth the effort. They have already joined, which makes future engagement feel much more natural.
It Creates a Foundation for Future Monetisation
A members-only structure can start with login-based access and later grow into something more advanced. Once you have an audience and a content workflow in place, it becomes much easier to introduce premium tiers, subscription access, or purchase-based restriction without rebuilding everything from scratch.
The Problem With Older Membership-Style Setups
A lot of WordPress site owners assume that creating a members-only blog means installing a large membership plugin and restructuring the site around it. That can work, but it often adds more complexity than the use case actually needs.
In many cases, the site owner does not need a huge account dashboard system, a complex permissions matrix, or a fully separate protected area. They simply need to restrict content after login in a way that feels clean and easy to manage.
Content Often Becomes Disconnected From the Page
Some systems push users away from the article they were reading into separate account areas, external forms, or detached content hubs. That breaks continuity and can make the whole process feel less polished than it should.
Layout Control Can Become Limited
Shortcode-heavy or template-heavy setups often reduce your ability to design the gated experience properly in Gutenberg. Instead of shaping the page visually, you end up working around technical limitations.
The Overall System Can Become Heavier Than Necessary
For simple login-based restriction, a full membership platform can introduce a lot of moving parts you may not actually need. That means more setup time, more maintenance, and more complexity in exchange for a workflow that could often be handled much more directly.
That is why a block-based gating approach is often the better starting point for a members-only blog.
A Better Approach: Restrict Content Directly Inside the Page
Instead of treating restricted content as something separate from the article, a block-based approach lets you handle it directly inside the page. You place a gate where access should change, keep the introduction visible, and allow the rest of the content to respond to the user’s login state.
This makes the page itself both the preview and the protected experience. Visitors can see enough to understand what they are getting, while logged-in users can continue seamlessly into the restricted section without being pushed into an unrelated flow.
That is a much more natural way to restrict content in WordPress easily. The content remains central, the layout remains intact, and the user experience stays in context.
It also means the restricted-state section can be designed properly. Rather than showing a plain locked message, you can add headings, explanatory text, login prompts, or forms directly into the content using normal WordPress blocks.
This approach is available in the free Lite version, while Pro expands the same workflow into purchases, subscriptions, roles, and other advanced conditions.
How to Create a Members-Only Blog Step by Step
The actual setup is much simpler than many site owners expect. You do not need to rebuild your content or create separate protected pages. In most cases, you can work directly inside the post or page you already have.
1. Write the Public Part of the Article First
Start by writing the part of the content that should remain visible to everyone. This might be your introduction, the first section of a tutorial, or the opening portion of a members-only blog post. The goal is to give users enough value and context to understand why continuing matters.
2. Insert the Gated Content Block Where Access Should Change
Once you reach the point where the content should become members-only, insert the gated content block. This block defines the boundary between public content and restricted content. Everything below it will follow the chosen access condition.
3. Set the Condition to Logged-In Users
For a members-only blog, the simplest rule is to restrict the content so that only logged-in users can see what is below the gate. This makes login the access condition and keeps the workflow straightforward.
4. Design the Logged-Out Experience
The area shown to logged-out visitors should do more than simply say access is restricted. It should help the user take the next step. You can include explanatory text, a prompt to log in, a registration flow, or native blocks such as the WordPress login block. Depending on your setup, you might also use WooCommerce account blocks or forms from plugins such as Gravity Forms.
5. Publish and Test the Page Properly
Once the page is published, test it from different user states. View it while logged out, then log in and make sure the restricted section appears correctly. This helps confirm that the content flow feels seamless and that the gate is placed in the right position.
That whole process happens directly in the block editor, which is one of the biggest advantages of this approach. You are not leaving the page to manage access. The page itself is where the structure lives.
Designing the Login Experience Properly
A strong members-only blog does not just restrict content. It explains the next step clearly and gives the user a straightforward way to take it. That means the logged-out experience deserves as much attention as the protected content itself.
Rather than showing a generic warning, you can use normal blocks to create a clear transition section. A heading can explain that the rest of the article is available to members, a paragraph can reinforce the benefit of continuing, and a login block or registration route can be placed directly underneath.
This keeps the experience inside the page and makes the gate feel intentional rather than abrupt. Users know what to do, why they should do it, and what they will get afterwards.
That is especially useful if your longer-term goal is to grow a loyal audience, because the login prompt becomes part of your content strategy rather than just a technical lock.
Why Server-Side Gating Still Matters
When you restrict content, the method used to enforce that restriction matters. Some systems only hide content visually using front-end techniques, which can leave the protected content sitting in the page source even when it should not be available.
For a members-only blog, that is not ideal. If restricted content is still being rendered and merely hidden, the access model is weaker than it appears. It can also create inconsistent behaviour when caching is involved.
A server-side approach is much stronger because the restricted content is only rendered when the user actually meets the required condition. If the visitor is not logged in, the protected section is not output in the first place.
This gives you cleaner access control, more predictable behaviour, and a stronger foundation as your members-only content becomes more valuable over time.
Conclusion
Creating a members-only blog in WordPress does not have to mean building a huge membership platform or forcing users through a disconnected account experience. In many cases, the better solution is to keep the content inside the page, place the gate where access should change, and use login as the condition that unlocks the rest.
That gives you a workflow that is easier to manage, easier for users to understand, and far more aligned with how modern WordPress content is built. You keep the public value visible, you encourage registration naturally, and you create a structure that can grow with your site.
For site owners who want to restrict content after login in WordPress without overcomplicating the process, that makes a block-based gating workflow one of the cleanest approaches available.
How to create a members-only blog in WordPress
Create a members-only WordPress blog with login-based content gating and a clean, server-side block workflow
Try the free Lite version here or Upgrade to Gated Content Block Pro and expand beyond login-based gating into purchases, subscriptions, roles, and more advanced access control.